A brown noise live stream looks almost too simple: one steady sound, one quiet visual, and a player that never seems to stop. The simplicity is exactly why weak execution stands out. A stolen recording, a tiny click at the join, or an inflated health claim can sink trust before the channel has a chance to become part of anyone’s routine.
The stronger approach is to treat the audio as an original product. Synthesize it, shape it for comfortable listening, build a genuinely clean loop, package it without medical promises, and test the complete stream on real devices. Here is a practical 2026 playbook for doing that from scratch.
Why brown noise had its moment
Brown noise became familiar far beyond audio-engineering circles through focus playlists, short-form videos, study communities, and discussions among ADHD-adjacent audiences. Many listeners describe its deeper character as easier to keep in the background than the brighter hiss of white noise. That is a preference, not evidence of a treatment outcome.
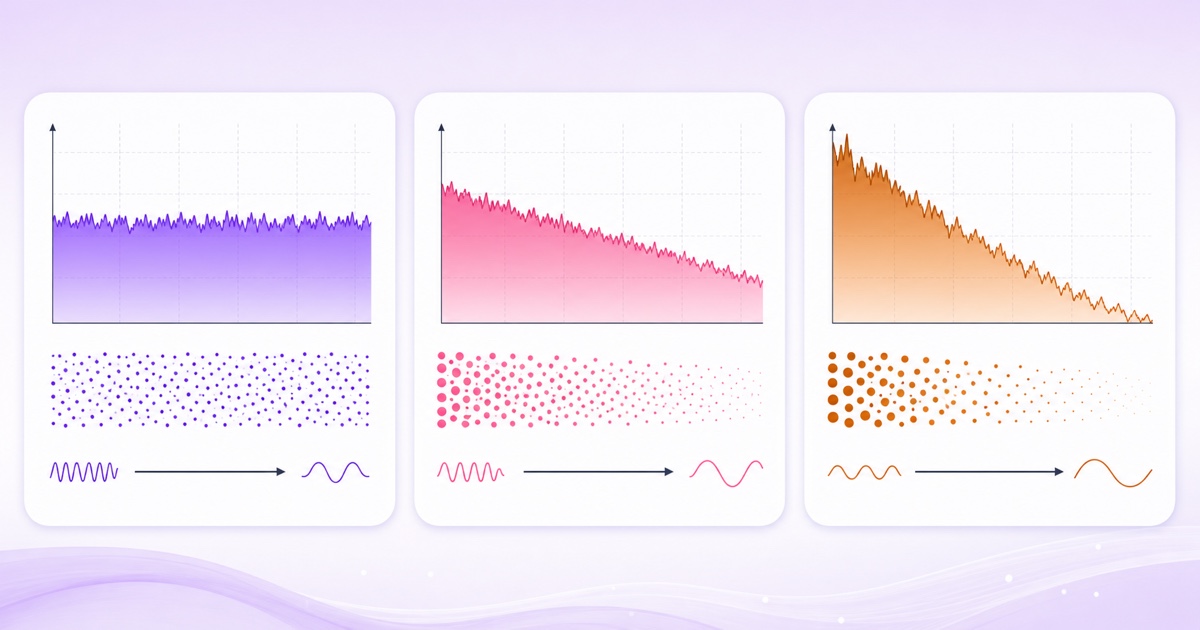
The names refer to how sound energy is distributed across frequencies. White noise has equal power per hertz, so its high-frequency region contains substantial energy and can sound bright. Pink noise reduces power as frequency rises, producing equal energy per octave and a softer balance. Brown noise, also called Brownian or red noise, rolls off more steeply—roughly 6 dB per octave—so low frequencies dominate and the result resembles a deep rush or distant waterfall.
| Noise type | Spectral balance | Common impression | Useful channel position |
|---|---|---|---|
| White | Equal power per hertz | Bright, hiss-like | Masking and general background sound |
| Pink | About 3 dB less power per octave as frequency rises | Balanced, softer | Relaxation, study, and speaker testing |
| Brown | About 6 dB less power per octave as frequency rises | Deep, rumbling, warm | Low-distraction focus or sleep-time ambience |
The table describes spectra, not a ranking. Some people prefer white noise, some pink, and some silence. Give viewers a clear sonic option instead of declaring one colour universally better.
The claim line you must not cross
A focus channel can describe how people use its sound. It should not tell them that the sound diagnoses, prevents, or treats a condition. “A steady background for reading and deep work” is an honest use description. “Treats ADHD,” “cures insomnia,” or “stops tinnitus” turns a listening option into an unsupported medical promise.
Keep that boundary in the title, thumbnail, description, spoken intro, pinned comment, and tags. Do not hide a treatment claim in search keywords after writing careful public copy. A simple note such as “This audio is provided for ambience and is not medical advice” adds clarity, but it does not make an otherwise misleading claim acceptable.
Moderation matters too. If a viewer reports that the audio makes them uncomfortable, the responsible reply is to lower the volume or stop listening—not to insist that discomfort proves it is working. Encourage sensible playback levels, especially with headphones. People with symptoms or health questions need qualified professional guidance, not a promise from a noise-channel description.
Generate original noise you actually own
Noise is easy to synthesize, but a recording of noise is still a recording. Copying another creator’s eight-hour upload can trigger ownership disputes and leaves you unable to prove a clean production chain. Generate your own master and keep the project file, export date, settings, and source artwork together.
Audacity provides a straightforward starting route:
- Create the source. Open a new project and use Generate → Noise. Choose Brownian noise, select a duration, and leave enough amplitude headroom to avoid clipping. Mono is enough for a centred noise bed; use stereo only when you intentionally design different left and right movement.
- Shape by listening, not by boosting blindly. Audacity’s current path is Effect → EQ and Filters → Filter Curve EQ. Make small adjustments if the low end overwhelms phone speakers or the upper range feels scratchy. Large bass boosts can create clipping without making the stream more useful.
- Set one loudness reference. Measure the master in a DAW or loudness meter, choose a conservative reference for your channel, and apply it to every export. For example, you might test around −18 LUFS integrated with true peaks kept below −1 dBTP, then adjust after device checks. This is a working reference, not a YouTube requirement.
- Render a long source. Export one to two hours rather than a tiny sample repeated every minute. A long render makes the texture feel less mechanically repetitive while remaining manageable to inspect and upload.
- Preserve evidence. Save the Audacity or DAW project, final WAV, MP4, thumbnail source, and a short production note. If a claim appears later, you can show how and when the sound was made.
The official Audacity generator index confirms that its Noise generator can create white, pink, or brown noise. Its Filter Curve EQ guide also warns that frequency boosts can push audio into clipping, which is why headroom belongs in the workflow.
Do not add a music bed unless you composed it or obtained a licence that expressly covers continuous live streaming. “Royalty-free” does not automatically mean every form of broadcast is allowed. Pure self-generated noise avoids that extra rights layer and gives the channel a clean foundation.
The seam is the product
A viewer may tolerate a plain thumbnail. They will notice a click, drop, or sudden tonal change that repeats on schedule. For a sleep or deep focus stream, that boundary is not a minor edit; it is the moment that breaks the promise.
Build the join with a crossfade rather than placing the raw end directly beside the raw beginning. In your DAW, copy the opening section, overlap it with the tail, fade the tail down while the copied opening fades up, and use an equal-power curve if a linear crossfade creates a dip in perceived level. The Audacity fade and crossfade guide explains the same principle: one section fades out while the next fades in, with the overlap smoothing the transition.
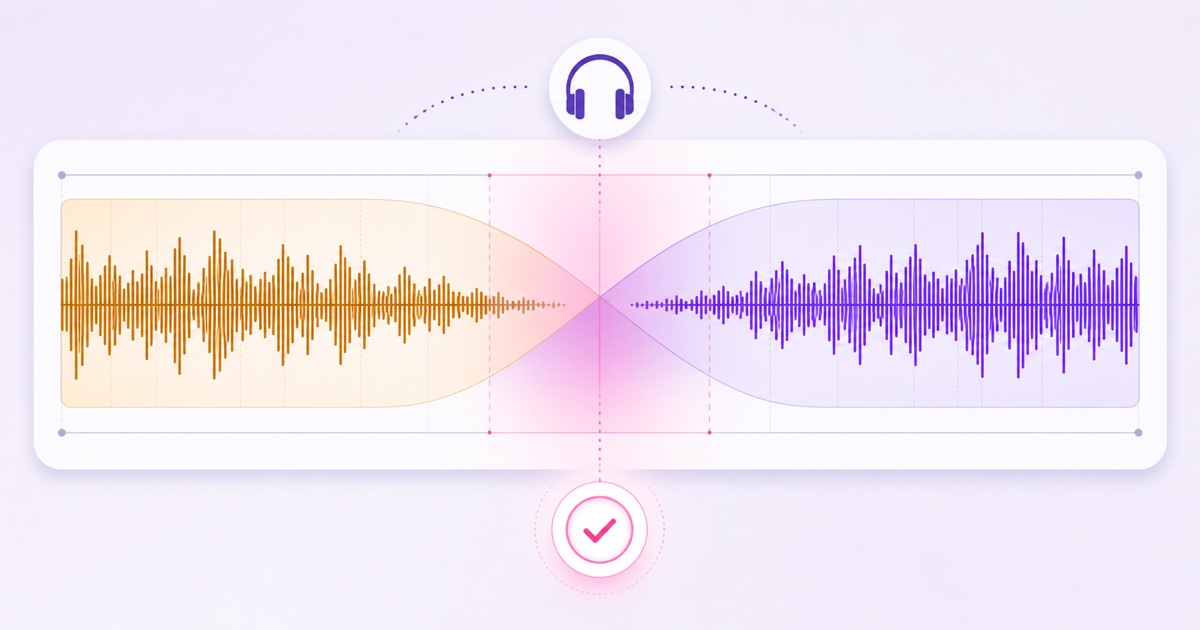
Use this seam test before you create the video:
- Listen to the final 30 seconds followed immediately by the first 30 seconds on studio headphones.
- Repeat the boundary three times without looking at the playhead. If you can point to the join, revise it.
- Check the same excerpt on phone speakers and inexpensive earbuds. Excess bass may disappear on one and distort on another.
- Inspect the waveform for a sudden jump, clipping, or a level dip inside the overlap.
- Encode the final MP4, then test its boundary again. A perfect audio master can still be damaged by an export setting or misplaced video edit.
Keep the audio sample rate consistent through the project and export. Pair it with a constant-frame-rate video so the player does not accumulate timing surprises across repeated passes. The goal is not merely an edit that looks smooth on screen; it is a join nobody notices after hours of listening.
Visuals for a noise channel
The audio does the work, so the picture should avoid competing with it. A static dark card, a very slow gradient, a restrained waveform, or a dim room abstraction all fit. Skip flashes, fast particles, hard white cuts, and bright clocks that turn a background stream into a visual interruption.
For a practical master, create a 1920×1080 canvas at 30 fps and export H.264 video with AAC audio. Constant frame rate matters more than elaborate motion. A mostly static frame compresses efficiently, which keeps a one- or two-hour source smaller than motion-heavy footage of the same length.
Check the image on three screens: a phone at low brightness, a laptop, and a television. Fine lines that look elegant on a monitor can shimmer after compression; pure black can swallow a subtle waveform on some displays. Use a dark charcoal or brown field with enough contrast to remain legible without lighting up a bedroom.
Make a distinct thumbnail rather than taking a random frame. Use one strong waveform shape, a warm brown cue, and very little copy. The deeper reasoning is covered in this guide to thumbnails for always-live streams. The stream visual can stay subdued even when the thumbnail needs enough contrast to earn a click.
Packaging and honest growth
A clear title beats a mysterious one. “Brown Noise 24/7 — Deep Focus & Sleep” tells viewers what the sound is, that the stream is continuous, and the contexts it was made for. Avoid stuffing ADHD, insomnia, tinnitus, baby sleep, meditation, studying, anxiety, and ten other promises into one line.
Use the first two description sentences to set expectations: the sound was synthesized by your channel, the visual is intentionally minimal, and the broadcast repeats a prepared loop. Add chapters only if the content actually changes. Put the medical boundary and safe-listening reminder where a viewer can see them without expanding a wall of text.
Then launch as a controlled test:
- In YouTube Studio, go to Create → Go Live → Stream, prepare the title and visibility, and copy the stream key. Treat that key like a password.
- In StreamNeo, use Dashboard → Videos → Upload Video for the tested MP4. Then open Streams, select the slot, enable YouTube, paste the key, choose the uploaded file, and begin with an unlisted run.
- Listen through the public watch page rather than trusting only the source preview. Let several loop boundaries pass and check YouTube’s stream-health panel.
- Switch to public only after the encoded output, title, thumbnail, description, and chat settings all look right.
One static-visual file in one cloud slot is a lean way to operate a continuous channel. It does not need a laptop left awake or an elaborate video rotation. Start free — 24-hour trial, no card.
Growth comes from usefulness and consistency, not exaggerated claims. Compare average concurrent viewers by time of day, returning viewers, thumbnail click-through rate, and the moments when viewers leave. Test one variable at a time: brown versus pink, a slightly warmer master, or focus-first versus sleep-first packaging. Do not change the audio, title, thumbnail, and schedule together or you will not know what helped.
Build adjacent programming only when the first stream has a repeat audience. A quiet Pomodoro format can send focused listeners to the noise stream; this 24/7 study-with-me channel guide shows the timer-led version. For a broader night-time library, use the sleep sounds and white noise playbook to separate each sound promise instead of cloning one channel under different colours.
More from the journal: Exam Season and Study Channels: Planning for Predictable Traffic · How to Build a Rolling Weather and Traffic Loop for a Local Audience · Turning a Radio Show Archive Into a 24/7 Talk Channel
FAQ
Is brown noise copyright-free?
Brown noise as a type of sound is not another creator’s property, but their rendered recording can be protected. Noise you synthesize and export yourself gives you a clean original master. Keep the project files and never download another channel’s audio for your loop.
Can I say it treats ADHD?
No. You can say the stream was designed as a steady background for focus, or that some listeners choose brown noise while working. Do not claim that it treats ADHD, insomnia, tinnitus, anxiety, or any other condition.
What video should accompany it?
Use a minimal dark visual: a restrained waveform, slow gradient, or static abstract scene. Avoid flashes and busy motion, test it at low brightness, and export a constant-frame-rate H.264/AAC file. The audio should remain the product.